你好,我是杨文坚。
经过之前几节课,我们了解到,Vue.js开发页面的最小单元就是组件,多个组件拼装组合成我们日常看到的Vue.js开发的Web页面。每个组件基于视图和逻辑代码,都可以独立实现功能的渲染和交互。
但是日常开发中,你会发现,页面上的所有组件的独立渲染功能,其实并不满足我们的需求,很多时候我们需要组件之间互相通信交换数据,甚至是互相通信进行相互的数据操作。
举个最常见的例子,在电商场景中,我们需要在订单界面重新编辑购物车商品数量,并实时计算订单总金额,具体效果案例是这样的:

你看,这个商品规格组件和订单信息一般都是不同组件,规格组件修改的数据要实时影响到订单数据显示。同时地址信息组件和订单信息组件也是不同组件,修改了地址信息,订单显示的信息也要实时修改。
类似的场景还有很多,核心就是要进行不同组件的数据联动,也就是数据通信。所以,这节课我们就由浅入深,看看如何用多种方法实现Vue.js3的数据跨组件通信。
Vue.js3项目开发过程有哪些组件通信场景?
在讲解多种组件的数据通信方式之前,我们先整体了解一下Vue.js3项目开发过程中会有哪些组件通信场景。
一般,组件的组合有基于组件嵌套的“父子组件”和基于组件并行组合的“兄弟组件”这两种情况,所以组件的数据通信一般都是处理“父子组件数据相互通信”和“兄弟组件数据相互通信”这两种场景。
在 Vue.js 中实现“父子组件”和“兄弟组件”数据单向数据通信,一般都是通过Props来进行的。“父组件”通过Props传入数据给“子组件”,而“兄弟组件”是基于“公共父组件”通过Props将数据传入子“兄弟组件”中,例如下图所示:
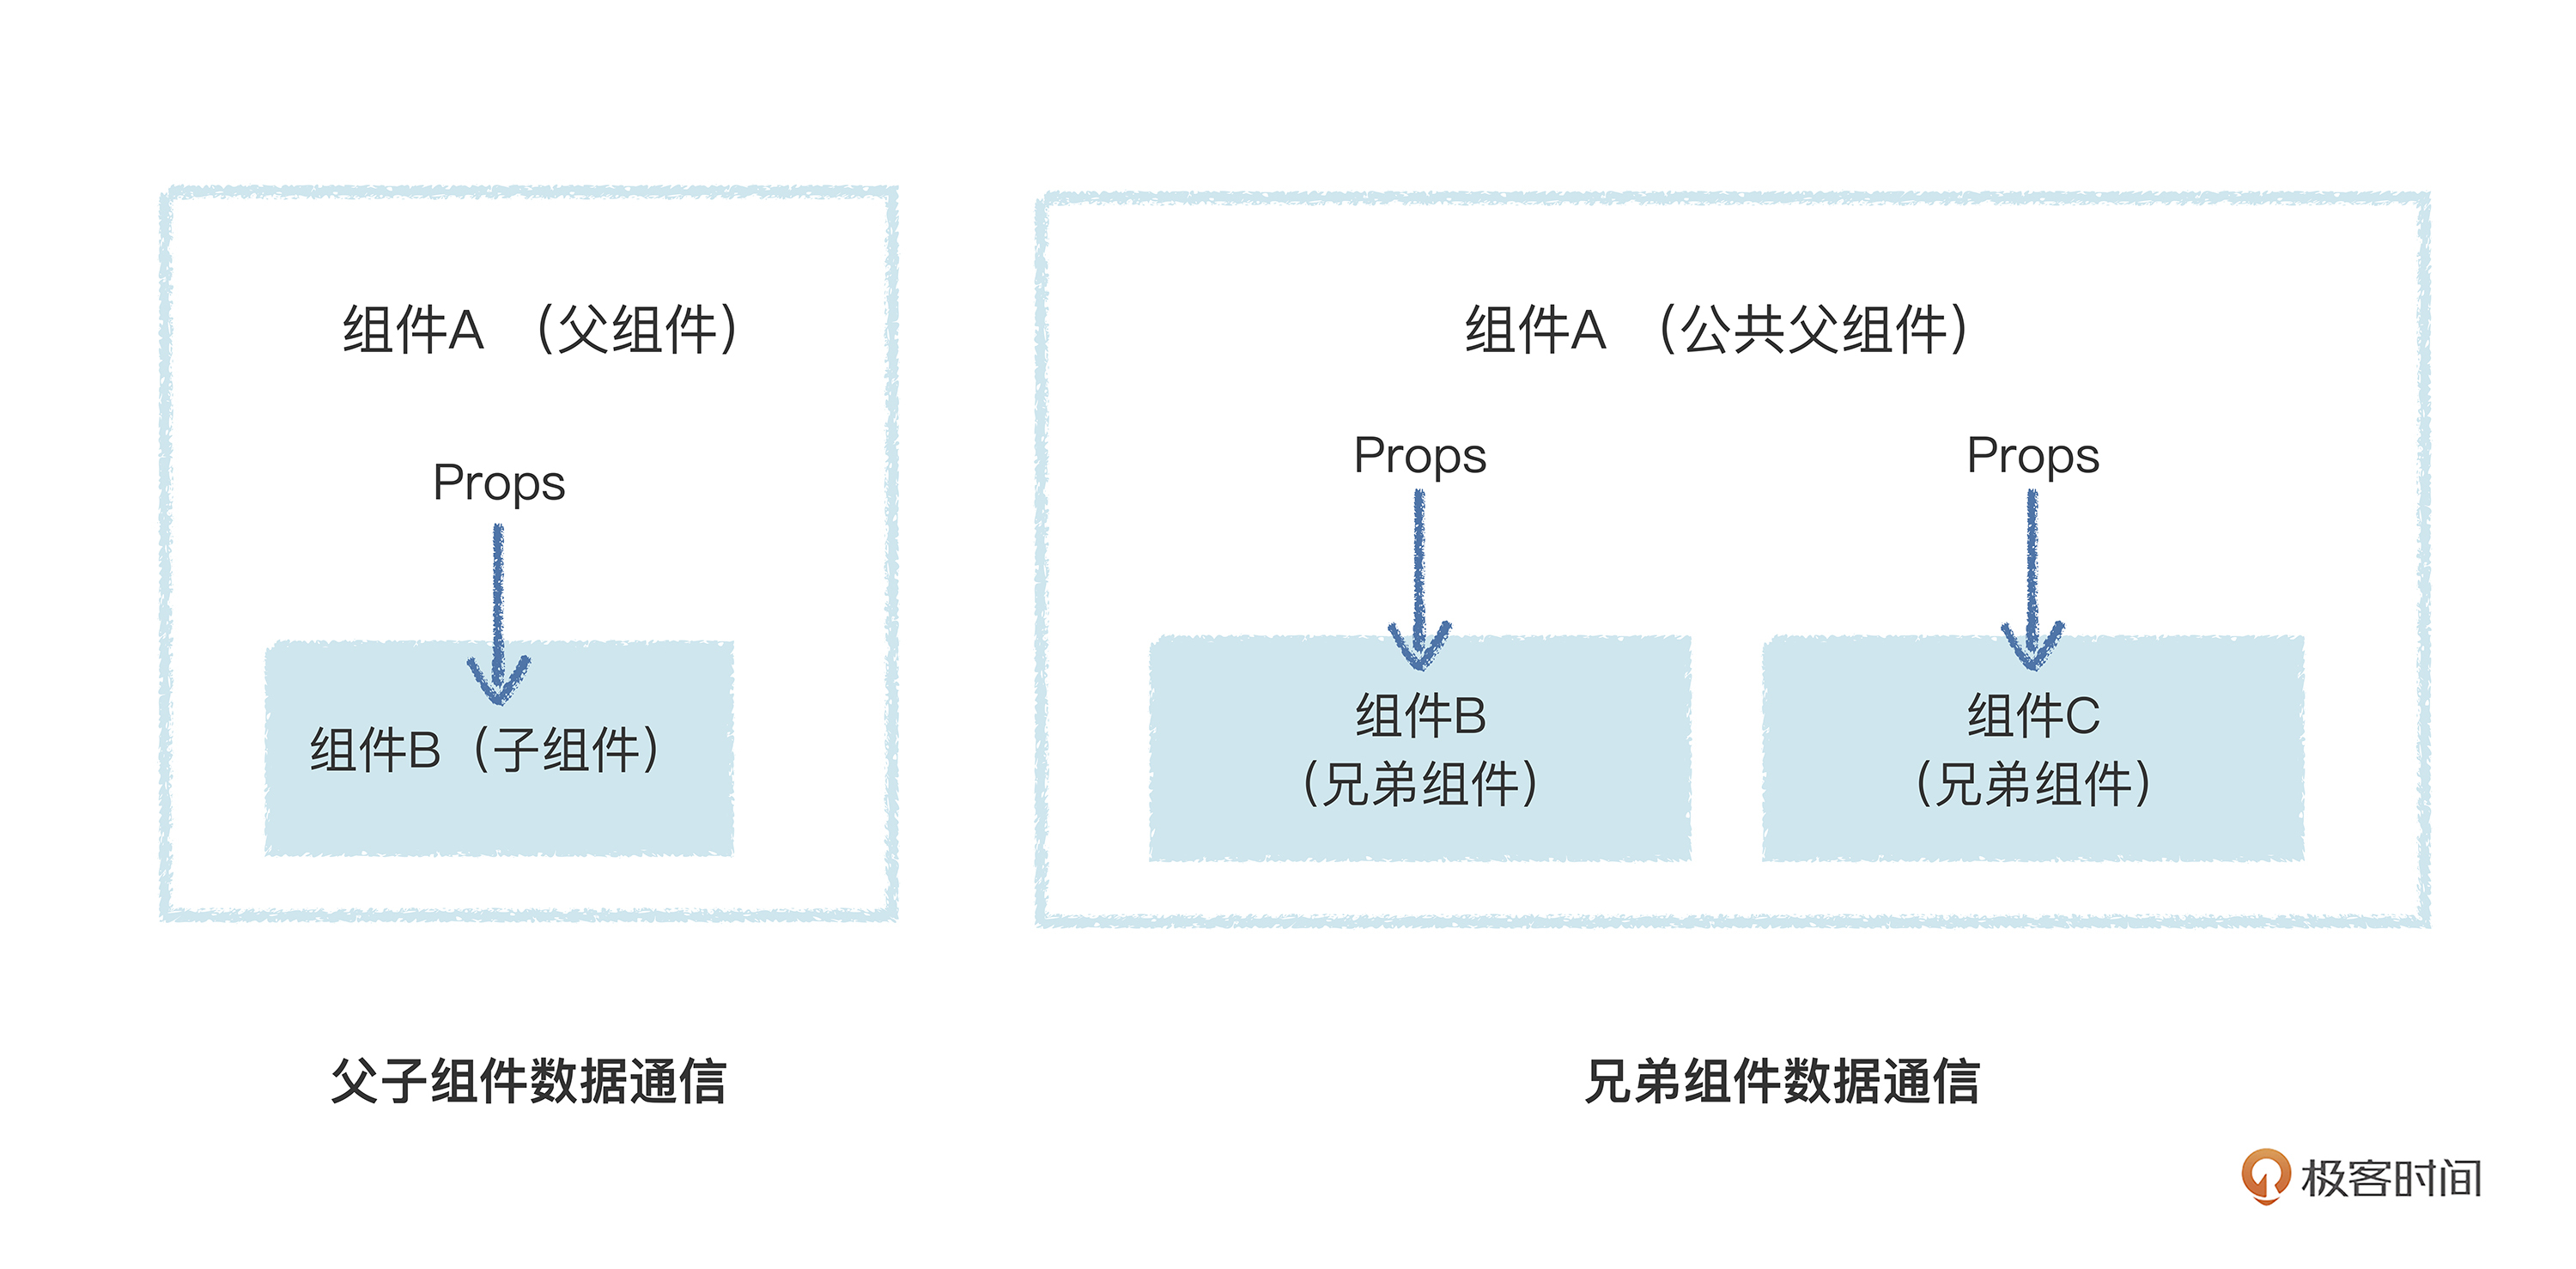
在实际过程中,这类通过纯Props的传输方式只能单向传递数据,不是双向传递,也就是数据只能从父组件流向子组件,或者从一个兄弟组件流向子兄弟组件。
看到这儿你可能会疑惑,根据上节课我们提到的响应式开发的知识点,难道Props不能将响应式数据传递到子组件里,然后在子组件里操作这个Props响应式数据来影响父组件吗?
如果你能提到这个问题,说明你上节课掌握得很不错,但是注意了,我们这节课讲的是数据跨组件通信,跟响应式不是一个维度上的技术点。
那么,为什么不能在子组件,或者子兄弟组件里修改Props的响应式数据来影响父组件做反向数据通信呢?我举一个实际的例子给你演示一下,你就知道是什么情况了。
以下代码是一个简单的文本编辑实时显示的组件,由两个组件嵌套组成,其中父组件包括了文本信息实时显示,子组件是文本输入框。父组件的通过 ref生成的响应式数据通过props传入子组件进行显示和修改。当子组件修改父组件props传入的响应式数据,控制台将会报错。
1
2
3
4
5
6
7
8
9
10
11
12
13
14
15
16
|
<template>
<div class="v-text">
<span>地址:</span>
<input :value="props.text" @input="onInput" />
</div>
</template>
<script setup>
const props = defineProps({
text: String,
});
const onInput = (e) => {
props.text = e.target.value;
}
</script>
|
1
2
3
4
5
6
7
8
9
10
11
12
13
|
<template>
<div>订单信息:{{text}}</div>
<div class="app">
<v-text v-bind:text="text" />
</div>
</template>
<script setup >
import { ref } from 'vue';
import VText from './text.vue'
const text = ref('环城东路888号');
</script>
|

当我们输入上图内容并运行时,控制台会显示这个警告:
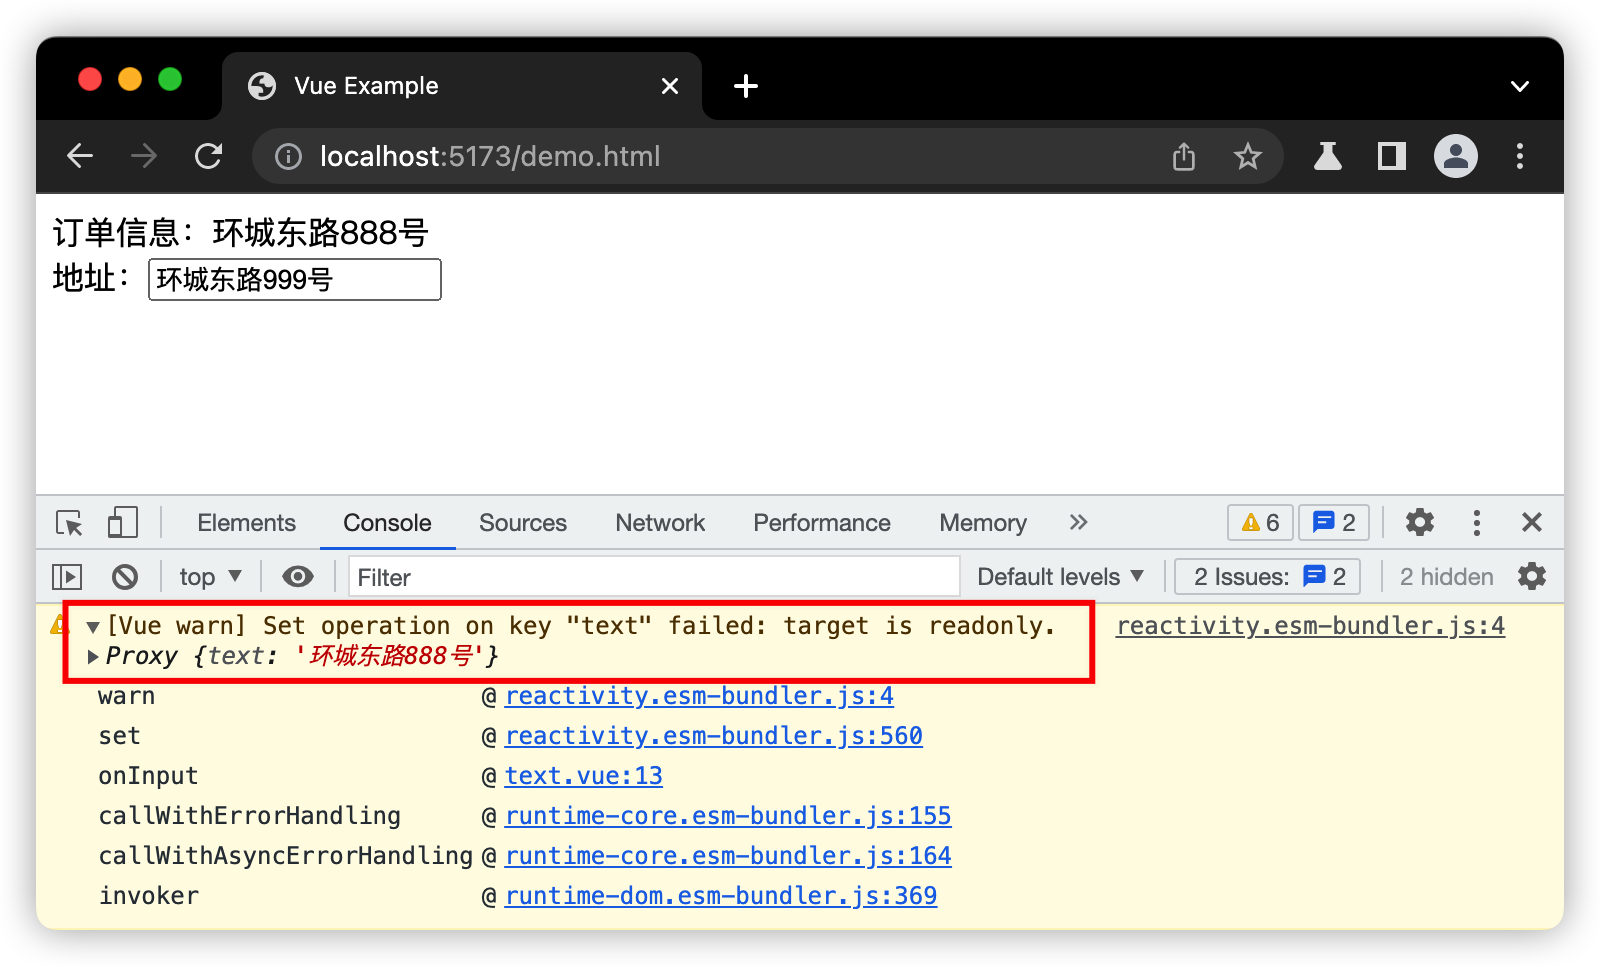
你看,当我们要在子组件里修改父组件通过Props传递过来的ref数据时,Vue.js3就会报出警告,表示这个数据是只读的。这个其实也是由Props技术定位决定的,类似React,传入Props数据必须是只读的,不能随意变化。
那么你可能又问了,如果Props传入的不是基础数据,而是reactive数据呢?
传入reactive的响应式对象数据,是可以在子组件里修改这个对象数据里的其它属性数据,来影响父组件的,但是直接修改这个reactive数据会报出同样的警告错误。这是因为对象的属性只是一层“引用”,不是指向原始响应式数据的“顶级引用”,这也不算是Bug,只能算是JavaScript的特性。
所以,在实际项目中,我们尽量以Props传入数据为只读数据,不要随便修改Props数据,避免后续Props数据的随意更改引起数据流操作的紊乱。
那么现在问题就来了,既然通过Props传递的数据只是单向传递,那么实际组件间通信如何实现双向通信呢?也就是说,子组件可以向父组件通信,兄弟组件可以通过向父组件通信影响其它兄弟组件。这就要结合Props和Emits来实现了。
如何基于Props和Emits实现跨组件通信?
前面我们说到,Props是父组件通过设置属性来传递数据给子组件,也就是父组件可以通过Props单向给子组件传递数据。
而Emits呢,是给子组件传入自定义事件,父组件可以把操作“父级数据”方法放在这个事件中传入子组件,子组件里执行这个传入的事件间接操作“父级数据”,达到在子组件里向父组件进行数据通信的效果。
我们把刚刚报错的代码修改一下,通过事件Emits的形式来进行在子组件里修改数据,最后影响父组件的数据,达到实现组件间的数据通信的效果:
1
2
3
4
5
6
7
8
9
10
11
12
13
14
15
16
17
|
<template>
<div class="v-text">
<span>地址:</span>
<input :value="props.text" @input="onInput" />
</div>
</template>
<script setup>
const props = defineProps({
text: String,
});
const emits = defineEmits(['onChangeText'])
const onInput = (e) => {
emits('onChangeText', e.target.value)
}
</script>
|
1
2
3
4
5
6
7
8
9
10
11
12
13
14
15
16
17
18
19
20
|
<template>
<div>订单信息:{{text}}</div>
<div class="app">
<v-text
v-bind:text="text"
v-on:onChangeText="onChangeText"
/>
</div>
</template>
<script setup >
import { ref } from 'vue';
import VText from './text.vue'
const text = ref('环城东路888号');
const onChangeText = (newText) => {
text.value = newText;
}
</script>
|

你可以看到,这一次,子组件可以注册自定义事件给父组件,然后父组件就在这个事件中传入操作“父级数据”的回调方法,接着子组件就可以通过执行这个方法,并且可以通过这个方法传入其它数据经过事件来影响到父组件。
简单来说就是父组件把操作某些“父级数据”方法给子组件来执行,通过这个操作指定数据的方法,通过自定义事件让子组件来操作父组件数据达到向父组件的通信,具体流程如下图所示:
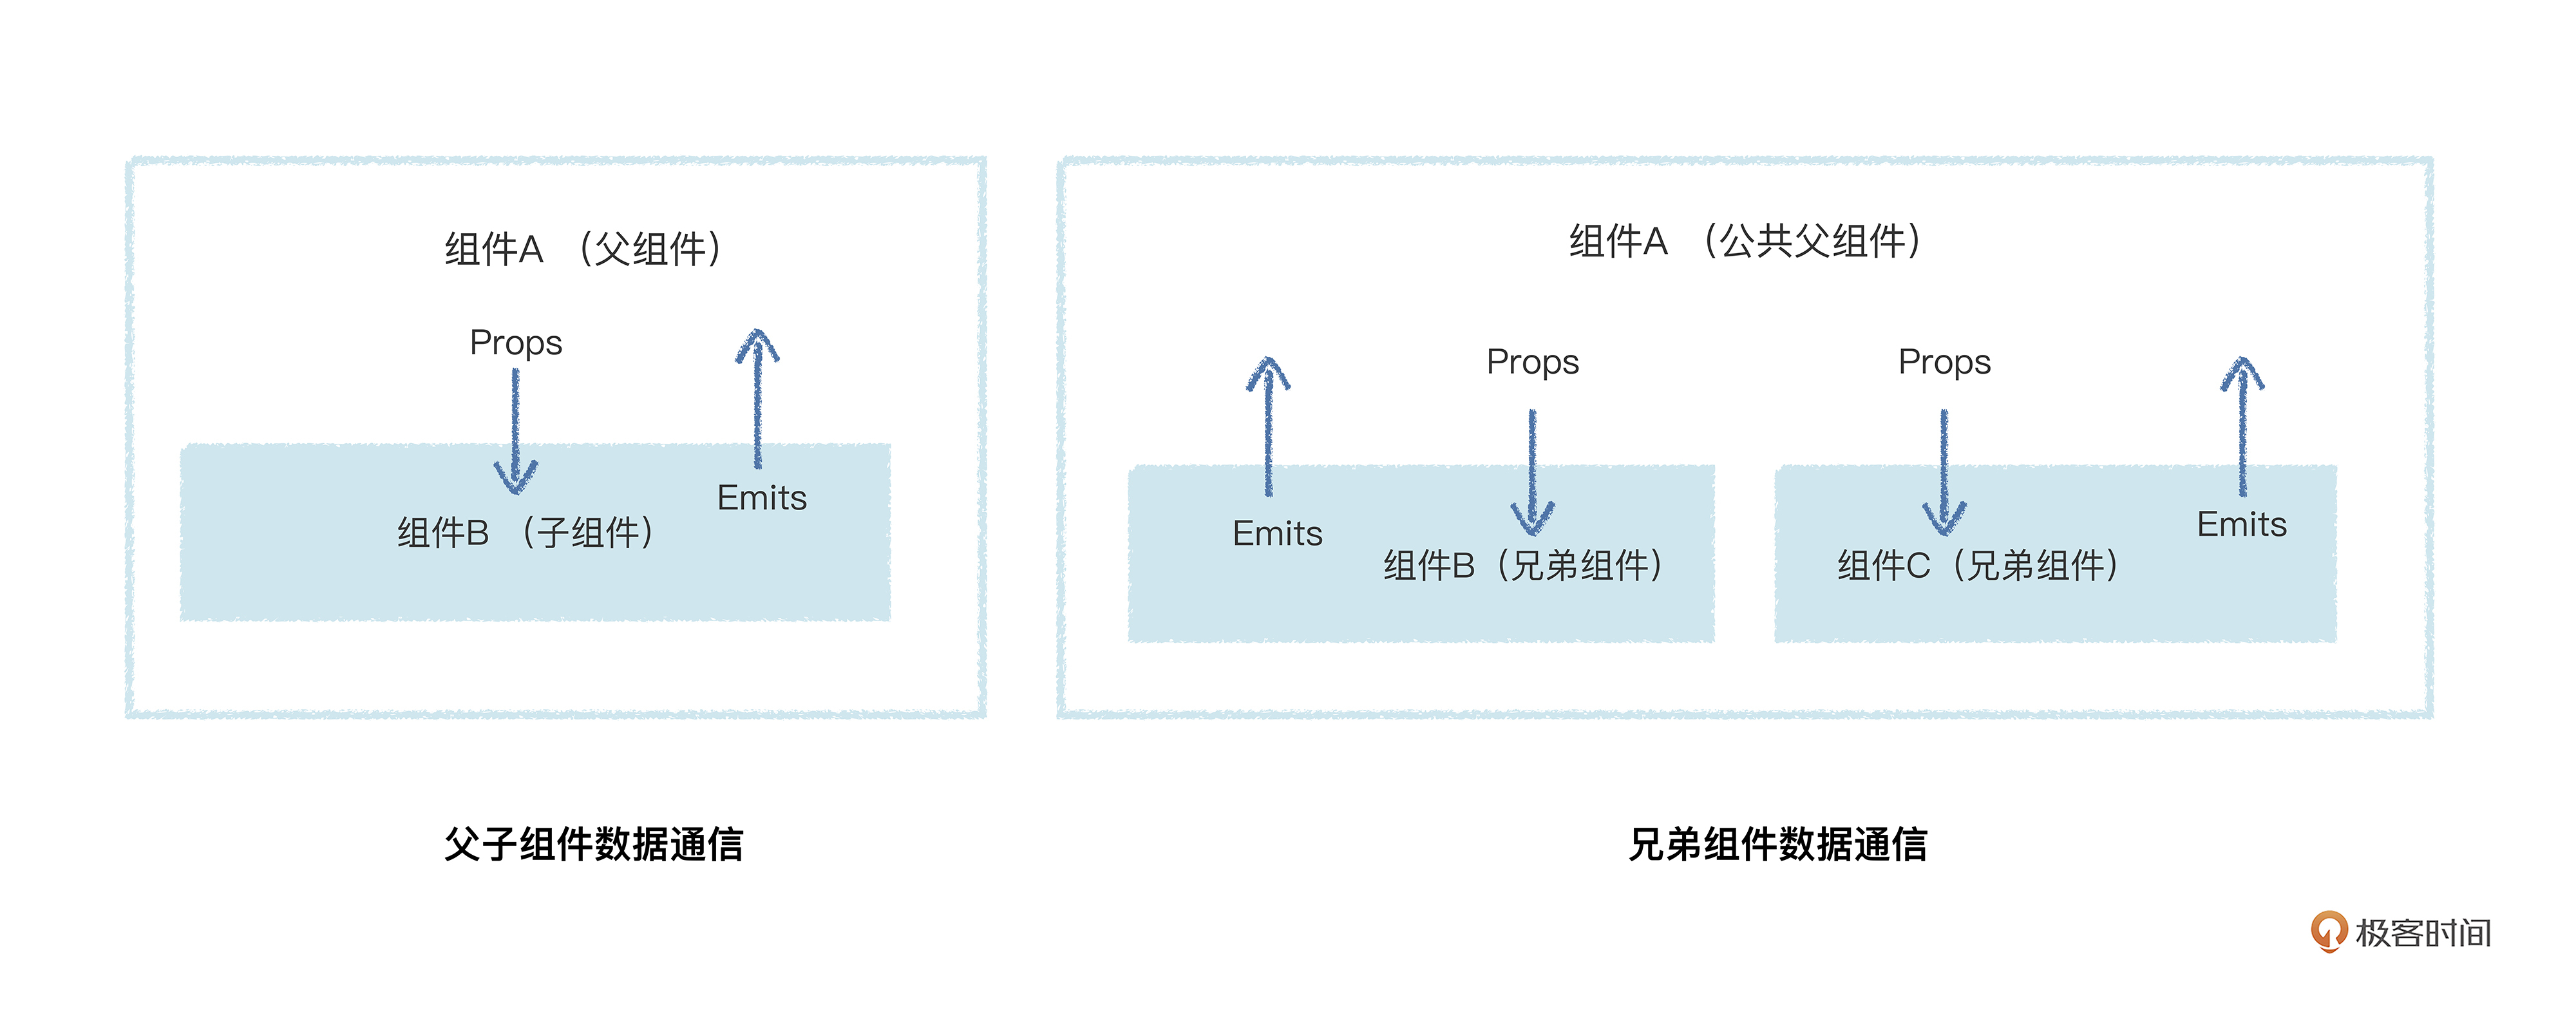
这样就形成了一个比较清晰的数据流向。父组件通过Props向子组件传递数据,子组件通过指定的自定义事件来操作指定的数据,不会带来数据污染。如果是兄弟组件的话,可以借助公共父组件做个自定义事件的中转,来进行相关指定的数据的通信。
如果用这个方式来实现我们一开始提出的电商订单的完整功能代码,可以参考下面的代码来实现。
父组件(最外层的组件)部分的代码如下:
1
2
3
4
5
6
7
8
9
10
11
12
13
14
15
16
17
18
19
20
21
22
23
24
25
26
27
28
29
30
31
32
33
34
35
36
37
38
39
40
41
42
43
44
45
46
47
48
49
50
51
52
53
|
<template>
  <div class="app">
    <v-info v-bind:text="state.text"  v-bind:list="state.list" />
    <v-text v-bind:text="state.text" v-on:updateText="updateText" />
    <v-list
      v-bind:list="state.list"
      v-on:increase="increase"
      v-on:decrease="decrease"
    />
  </div>
</template>

<script setup >
import { reactive } from 'vue';
import VInfo from './components/info.vue'
import VText from './components/text.vue'
import VList from './components/list.vue';

const state = reactive({
  text: '环城东路888号',
  list: [
    { name: '苹果', price: 20, count: 0 },
    { name: '香蕉', price: 12, count: 0 },
    { name: '梨子', price: 15, count: 0 },
  ]
});

const updateText = (text) => {
  state.text = text;
}

const increase = (index) => {
  state.list[index].count += 1;
}

const decrease = (index) => {
  if (state.list[index].count > 0) {
    state.list[index].count -= 1;
  }
}
</script>

<style>
.app {
  width: 600px;
  padding: 10px;
  margin: 10px auto;
  box-shadow: 0px 0px 9px #00000066;
  text-align: center;
}
</style>
|
子组件(订单显示信息)部分的代码如下:
1
2
3
4
5
6
7
8
9
10
11
12
13
14
15
16
17
18
19
20
21
22
23
24
25
26
27
28
29
30
31
32
33
34
35
36
37
38
39
40
41
42
| <template>
<div class="v-info">
<div>订单信息:</div>
<div>收货地址:{{props.text}}</div>
<div>总金额:{{totalPrice}}</div>
</div>
</template>
<script setup>
import { ref, watch } from 'vue';
const props = defineProps({
text: String,
list: Array,
});
const totalPrice = ref(0);
watch(props, () => {
const list = props.list;
let total = 0;
list.forEach((item) => {
total += item.price * item.count;
});
totalPrice.value = total;
})
</script>
<style>
.v-info {
width: 400px;
margin: 20px auto;
padding: 10px;
box-shadow: 0px 0px 16px 0px #00000038;
border: 1px solid #d6d5d5;
font-size: 20px;
color: #222222;
background: #ffffff;
font-size: 18px;
text-align: left;
line-height: 22px;
}
</style>
|
子组件(地址文本编辑器)部分的代码如下:
1
2
3
4
5
6
7
8
9
10
11
12
13
14
15
16
17
18
19
20
21
22
23
24
25
26
27
28
29
30
31
32
33
34
35
36
37
38
39
40
| <template>
<div class="v-text">
<span>地址:</span>
<input :value="props.text" v-on:input="onInput" />
</div>
</template>
<script setup >
const props = defineProps({
text: String,
});
const emits = defineEmits(['updateText']);
const onInput = (e) => {
emits('updateText', e.target.value);
}
</script>
<style>
.v-text {
width: 400px;
margin: 20px auto;
padding: 10px;
box-shadow: 0px 0px 16px 0px #00000038;
border: 1px solid #d6d5d5;
font-size: 20px;
color: #222222;
background: #2196f34d;
font-size: 16px;
}
.v-text input {
width: 200px;
height: 32px;
line-height: 32px;
margin-right: 10px;
box-sizing: border-box;
font-size: 16px;
}
</style>
|
子组件(商品规格选择器)部分的代码如下:
1
2
3
4
5
6
7
8
9
10
11
12
13
14
15
16
17
18
19
20
21
22
23
24
25
26
27
28
29
30
31
32
33
34
35
36
37
38
39
40
41
42
43
44
45
46
47
48
49
50
51
52
53
54
55
56
57
58
59
60
61
62
63
64
65
66
67
68
69
70
| <template>
<div class="v-list">
<div class="v-list-item" v-for="(item, index) in list">
<span class="text">{{item.name}}</span>
<span class="text">单价: {{item.price}}</span>
<button class="btn" v-on:click="onClickDecrease(index)">-</button>
<span class="count"> {{item.count}}</span>
<button class="btn" v-on:click="onClickIncrease(index)">+</button>
</div>
</div>
</template>
<script setup>
const props = defineProps({
list: Array,
})
const emits = defineEmits(['increase', 'decrease'])
const onClickIncrease = (index) => {
emits('increase', index)
}
const onClickDecrease = (index) => {
emits('decrease', index)
}
</script>
<style>
.v-list {
width: 400px;
margin: 20px auto;
padding: 10px;
box-shadow: 0px 0px 16px 0px #00000038;
border: 1px solid #d6d5d5;
font-size: 20px;
color: #222222;
background: #2196f34d;
font-size: 16px;
}
.v-list .v-list-item {
border-bottom: 1px solid #7aafe29c;
line-height: 32px;
padding: 4px 0;
text-align: left;
display: flex;
justify-content: center;
align-items: center;
}
.v-list .v-list-item .text {
width: 120px;
display: inline-block;
text-align: center;
}
.v-list .v-list-item .count {
min-width: 50px;
display: inline-block;
text-align: center;
font-size: 24px;
font-weight: 800;
color: #026181;
}
.v-list .v-list-item .btn {
display: inline-block;
width: 40px;
height: 40px;
font-size: 30px;
cursor: pointer;
box-sizing: border-box;
}
</style>
|
不过,虽然借助Props和Emits是能清晰地看到和管理数据通信流向,但是要写一堆自定义事件和方法代码,比较麻烦。而且,Props传入响应式数据是只读的,完全发挥不了响应式数据的优势,那么,有其它的方法来充分发挥响应式的优势并实现双向数据通信吗?
答案是有的,就是直接使用公共响应式数据文件实现跨组件通信。
使用公共响应式数据文件实现跨组件通信
这种方法也就是响应式数据不通过Props传递,而是通过“组合方式”使用,这也是发挥了“响应式数据”+“组合式API” 的双重优势。我先给你画个图讲解一下:
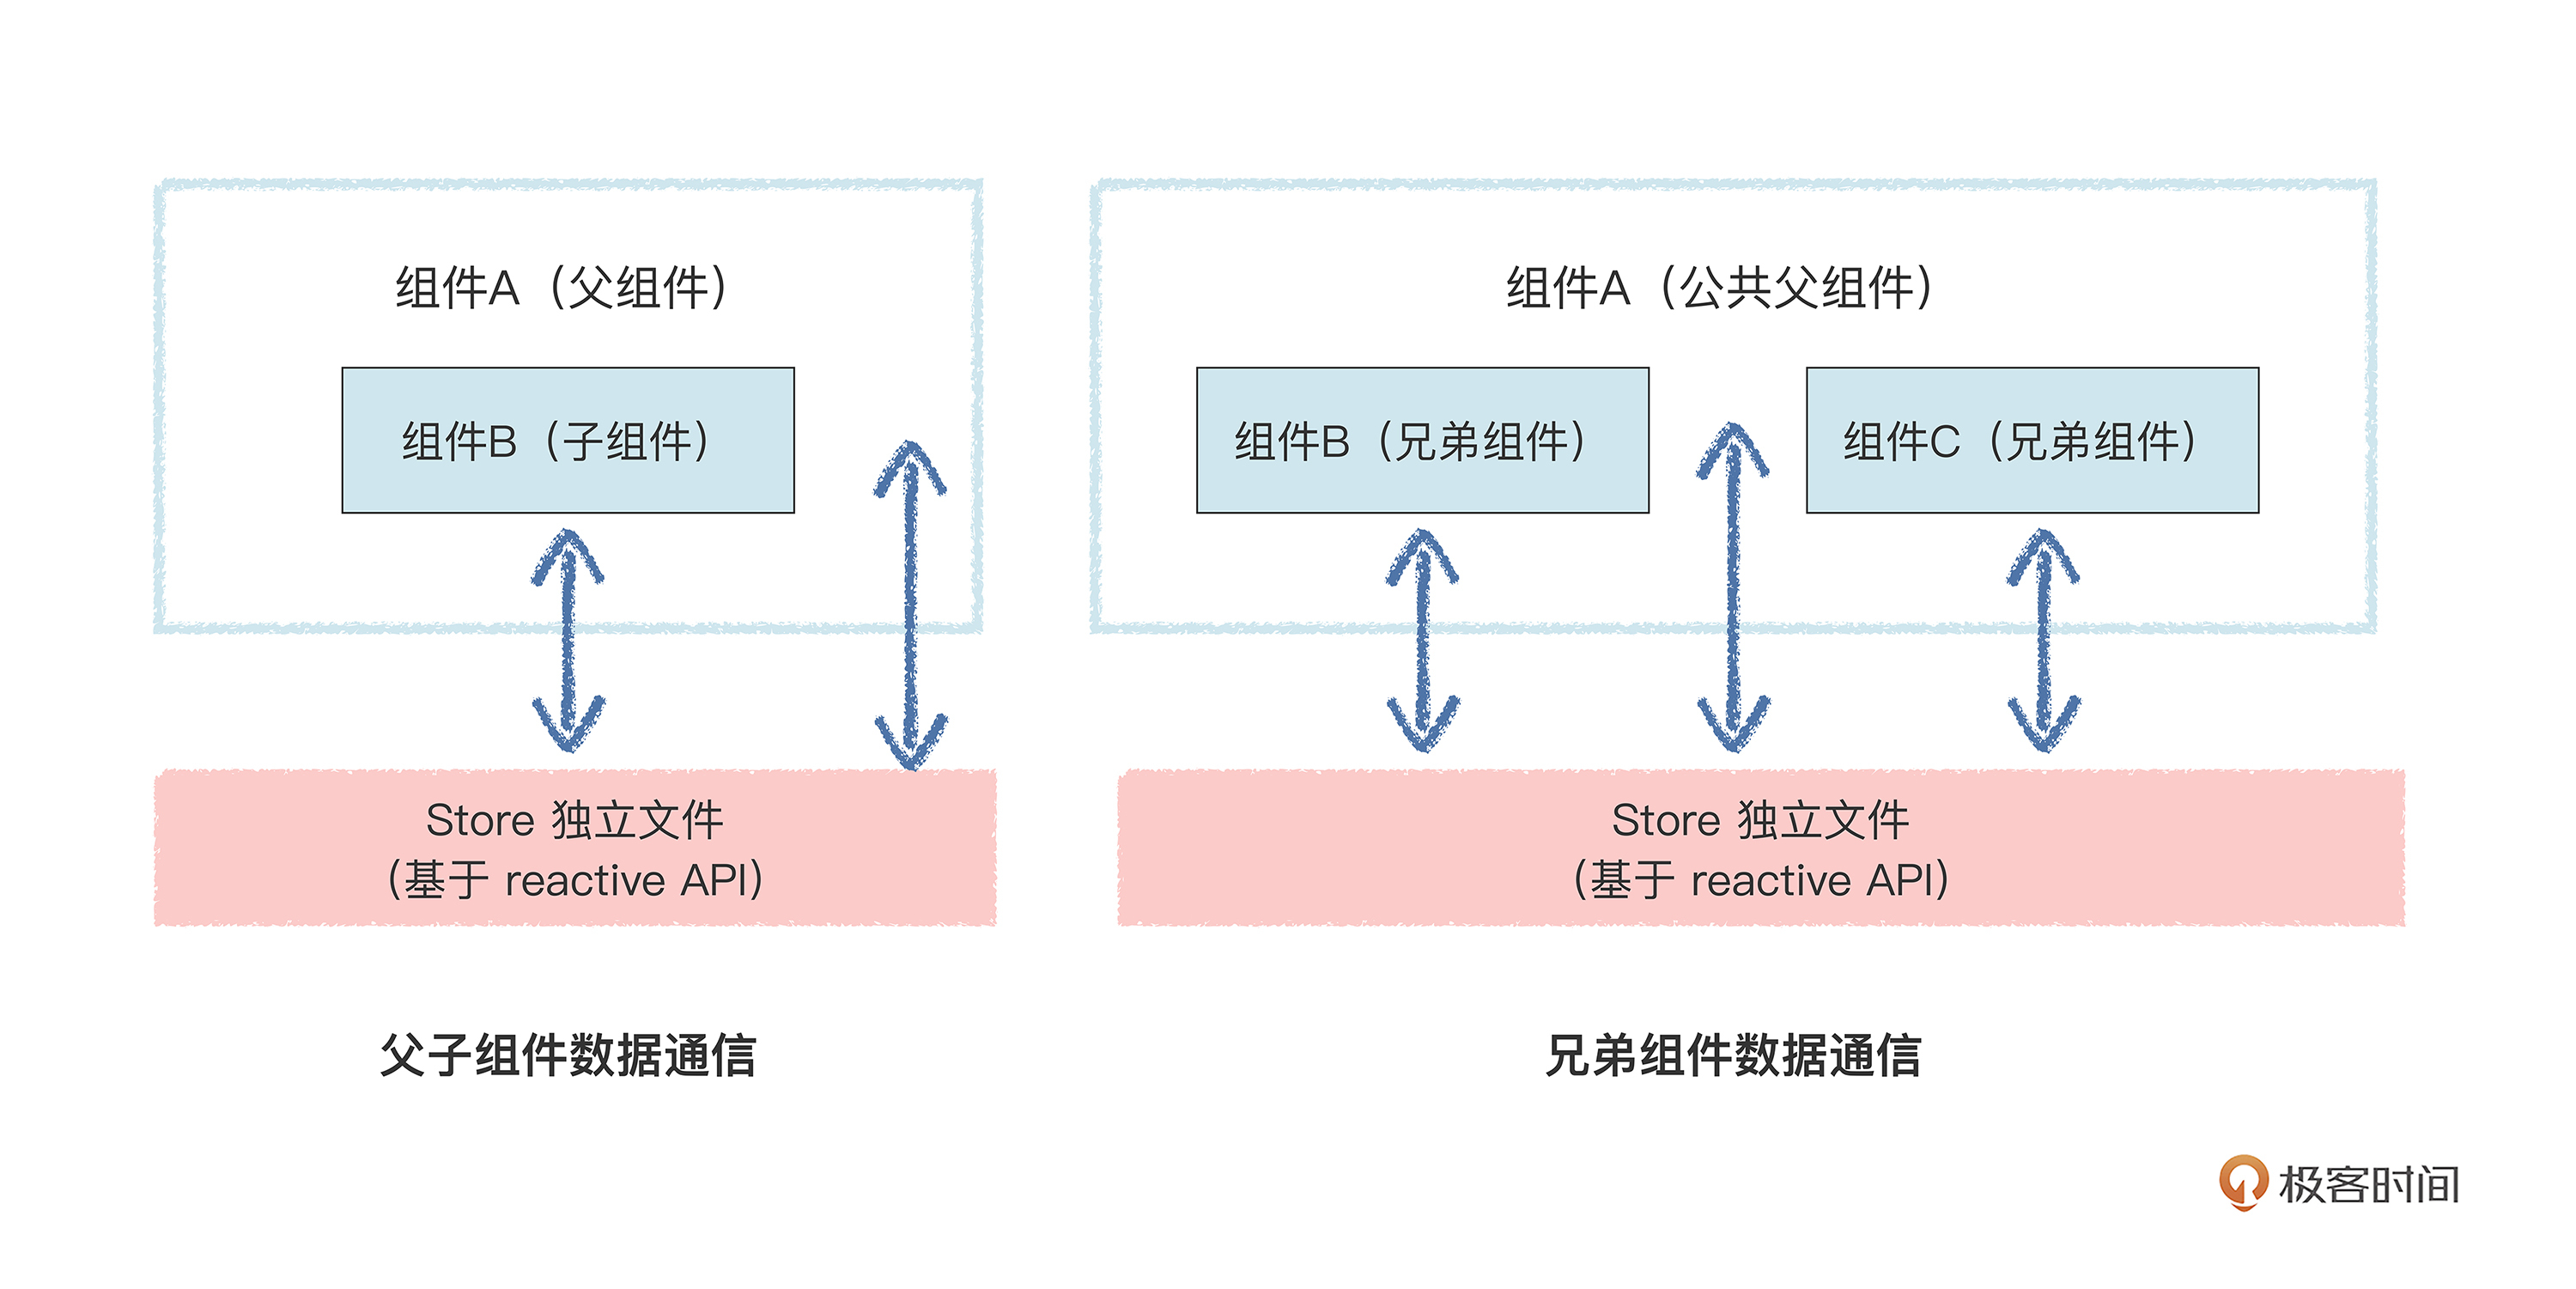
我们把公共数据都放在一个响应式数据的文件里,无论是父组件还是子组件,都直接引用这个文件里的数据,然后直接在各自组件间进行读数据或写数据。如果有组件里的模板视图使用到这个公共响应式数据,数据被其它组件修改,也会同时触发模板视图的更新。
那么,我们再将前面写的电商订单模块代码修改成这种方式的,修改后如下。
公共响应式数据的独立文件:
1
2
3
4
5
6
7
8
9
10
| import { reactive } from 'vue';
export const store = reactive({
text: '环城东路888号',
list: [
{ name: '苹果', price: 20, count: 0 },
{ name: '香蕉', price: 12, count: 0 },
{ name: '梨子', price: 15, count: 0 },
]
});
|
父组件(最外层的组件):
1
2
3
4
5
6
7
8
9
10
11
12
13
14
15
16
17
18
19
20
21
22
23
24
| <template>
<div class="app">
<v-info />
<v-text />
<v-list/>
</div>
</template>
<script setup >
import { reactive } from 'vue';
import VInfo from './components/info.vue'
import VText from './components/text.vue'
import VList from './components/list.vue';
</script>
<style>
.app {
width: 600px;
padding: 10px;
margin: 10px auto;
box-shadow: 0px 0px 9px #00000066;
text-align: center;
}
</style>
|
子组件(订单显示信息):
1
2
3
4
5
6
7
8
9
10
11
12
13
14
15
16
17
18
19
20
21
22
23
24
25
26
27
28
29
30
31
32
33
34
35
36
37
38
| <template>
<div class="v-info">
<div>订单信息:</div>
<div>收货地址:{{store.text}}</div>
<div>总金额:{{totalPrice}}</div>
</div>
</template>
<script setup>
import { ref, watch } from 'vue';
import { store } from '../store';
const totalPrice = ref(0);
watch(store, () => {
let total = 0;
store.list.forEach((item) => {
total += item.price * item.count;
});
totalPrice.value = total;
})
</script>
<style>
.v-info {
width: 400px;
margin: 20px auto;
padding: 10px;
box-shadow: 0px 0px 16px 0px #00000038;
border: 1px solid #d6d5d5;
font-size: 20px;
color: #222222;
background: #ffffff;
font-size: 18px;
text-align: left;
line-height: 22px;
}
</style>
|
子组件(地址文本编辑器):
1
2
3
4
5
6
7
8
9
10
11
12
13
14
15
16
17
18
19
20
21
22
23
24
25
26
27
28
29
30
31
32
33
34
35
36
37
38
39
| <template>
<div class="v-text">
<span>地址:</span>
<input :value="store.text" v-on:input="onInput" />
</div>
</template>
<script setup >
import { store } from '../store';
const onInput = (e) => {
store.text = e.target.value;
}
</script>
<style>
.v-text {
width: 400px;
margin: 20px auto;
padding: 10px;
box-shadow: 0px 0px 16px 0px #00000038;
border: 1px solid #d6d5d5;
font-size: 20px;
color: #222222;
background: #2196f34d;
font-size: 16px;
}
.v-text input {
width: 200px;
height: 32px;
line-height: 32px;
margin-right: 10px;
box-sizing: border-box;
font-size: 16px;
}
</style>
|
子组件(商品规格选择器):
1
2
3
4
5
6
7
8
9
10
11
12
13
14
15
16
17
18
19
20
21
22
23
24
25
26
27
28
29
30
31
32
33
34
35
36
37
38
39
40
41
42
43
44
45
46
47
48
49
50
51
52
53
54
55
56
57
58
59
60
61
62
63
64
65
66
67
68
69
70
| <template>
<div class="v-list">
<div class="v-list-item" v-for="(item, index) in store.list">
<span class="text">{{item.name}}</span>
<span class="text">单价: {{item.price}}</span>
<button class="btn" v-on:click="onClickDecrease(index)">-</button>
<span class="count"> {{item.count}}</span>
<button class="btn" v-on:click="onClickIncrease(index)">+</button>
</div>
</div>
</template>
<script setup>
import { store } from '../store';
const onClickIncrease = (index) => {
store.list[index].count += 1
}
const onClickDecrease = (index) => {
if (store.list[index].count > 0) {
store.list[index].count -= 1
}
}
</script>
<style>
.v-list {
width: 400px;
margin: 20px auto;
padding: 10px;
box-shadow: 0px 0px 16px 0px #00000038;
border: 1px solid #d6d5d5;
font-size: 20px;
color: #222222;
background: #2196f34d;
font-size: 16px;
}
.v-list .v-list-item {
border-bottom: 1px solid #7aafe29c;
line-height: 32px;
padding: 4px 0;
text-align: left;
display: flex;
justify-content: center;
align-items: center;
}
.v-list .v-list-item .text {
width: 120px;
display: inline-block;
text-align: center;
}
.v-list .v-list-item .count {
min-width: 50px;
display: inline-block;
text-align: center;
font-size: 24px;
font-weight: 800;
color: #026181;
}
.v-list .v-list-item .btn {
display: inline-block;
width: 40px;
height: 40px;
font-size: 30px;
cursor: pointer;
box-sizing: border-box;
}
</style>
|
你看,直接用一个公共的文件管理响应式数据进行组件间数据通信,是不是很自由方便?但是自由方便都是有代价的,这个代价就是不好管理和维护。
你可以想像一下,一堆公共响应式数据,都可以在任何组件里被修改,数据流向管理很混乱,不清楚什么时候哪个组件对某个公共数据做了修改,影响了其它组件的视图内容显示。
那么,既要自由方便,又要管理方便,有更好的办法可以兼顾这两者吗?其实也有,Vue.js3官方早就想到了。**Vue.js3官方提供了一个数据管理的JavaScript库,也就是Pinia,就可以做到这一点。**所以,接下来我们再来看看如何基于Pinia实现跨组件数据通信。
基于Pinia实现的跨组件数据通信
首先,我来给你介绍一下什么是Pinia。简单来讲,Pinia就是一个基于Proxy实现的Vue.js公共状态数据管理的JavaScript库,可以提供组件间的数据通信,也可以跟踪定位数据的变化。
我画个图给你演示说明一下:
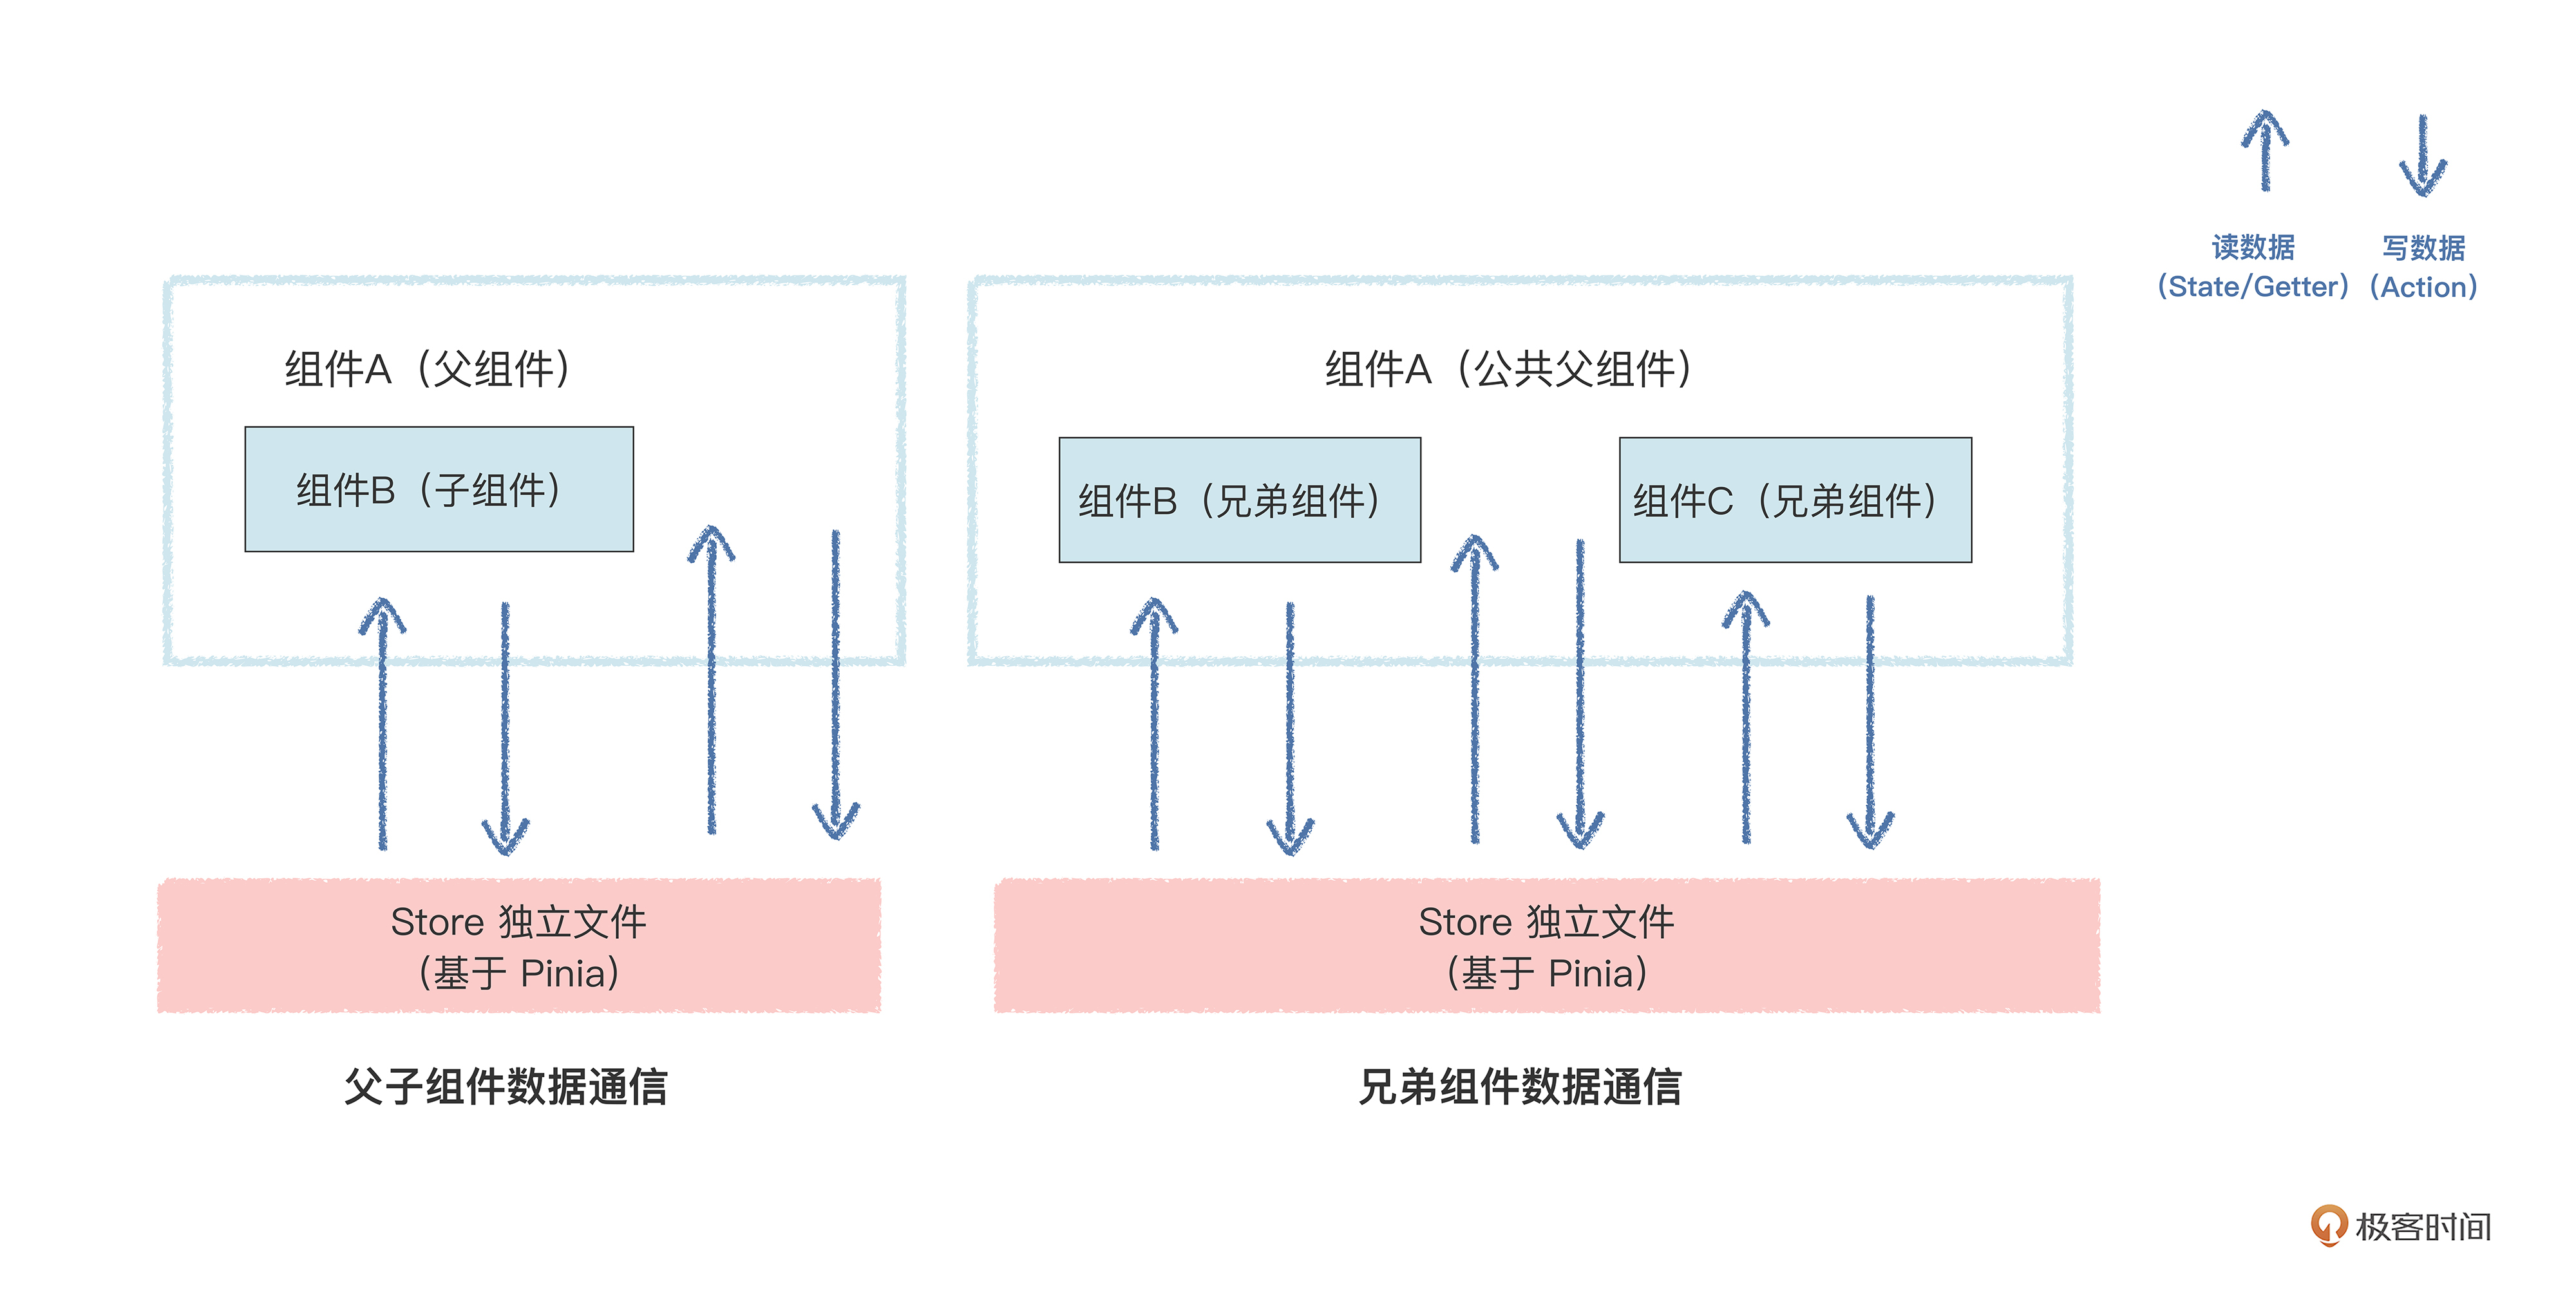
你可以看到,Pinia可以定义一个公共的数据store,在这个公共数据里管理多个数据的操作和计算。各个组件,无论是父子组件关系还是兄弟组件管理,都基于这个store来进行读数据展示和写数据更新状态,读写过程都是分开管理。读数据基于内置的Getter和State属性,写数据基于内部的Action方法。
数据流向都经过store统一进行管理,一旦整个应用出现什么数据读写异常或者数据被污染,都可以通过Pinia这个公共store来进行定位排查。
我们还是再写点代码来验证一下效果,把上述的代码通过Pinia来改造一下,同样也能实现多个组件的数据通信,达到实现商品订单数据的实时更新的效果。看代码。
Pinia定义的独立store文件:
1
2
3
4
5
6
7
8
9
10
11
12
13
14
15
16
17
18
19
20
21
22
23
24
25
26
27
28
29
30
31
32
33
34
35
36
37
38
39
40
| import { defineStore } from 'pinia';
export const useMyStore = defineStore('my-store', {
state: () => ({
text: '环城东路888号',
list: [
{ name: '苹果', price: 20, count: 0 },
{ name: '香蕉', price: 12, count: 0 },
{ name: '梨子', price: 15, count: 0 },
]
}),
getters: {
totalPrice(state) {
let total = 0;
state.list.forEach((item) => {
total += item.price * item.count;
});
return total;
},
},
actions: {
updateText(text) {
this.text = text;
},
increase(index) {
this.list[index].count += 1;
},
decrease(index) {
if (this.list[index].count > 0) {
this.list[index].count -= 1;
}
}
}
})
|
父组件(最外层的组件):
1
2
3
4
5
6
7
8
9
10
11
12
13
14
15
16
17
18
19
20
21
22
23
24
25
| <template>
<div class="app">
<v-info />
<v-text />
<v-list/>
</div>
</template>
<script setup >
import { reactive } from 'vue';
import VInfo from './components/info.vue'
import VText from './components/text.vue'
import VList from './components/list.vue';
</script>
<style>
.app {
width: 600px;
padding: 10px;
margin: 10px auto;
box-shadow: 0px 0px 9px #00000066;
text-align: center;
}
</style>
|
子组件(订单显示信息):
1
2
3
4
5
6
7
8
9
10
11
12
13
14
15
16
17
18
19
20
21
22
23
24
25
26
27
28
29
30
31
32
33
34
| <template>
<div class="v-info">
<div>订单信息:</div>
<div>收货地址:{{myStore.text}}</div>
<div>总金额:<span class="v-info-value">{{myStore.totalPrice}}</span></div>
</div>
</template>
<script setup>
import { useMyStore } from '../store';
const myStore = useMyStore();
</script>
<style>
.v-info {
width: 400px;
margin: 20px auto;
padding: 10px;
box-shadow: 0px 0px 16px 0px #00000038;
border: 1px solid #d6d5d5;
font-size: 20px;
color: #222222;
background: #ffffff;
font-size: 18px;
text-align: left;
line-height: 1.5;
}
.v-info-value {
font-size: 24px;
font-weight: 800;
color: #fe3030;
}
</style>
|
子组件(地址文本编辑器):
1
2
3
4
5
6
7
8
9
10
11
12
13
14
15
16
17
18
19
20
21
22
23
24
25
26
27
28
29
30
31
32
33
34
35
36
37
38
39
40
| <template>
<div class="v-text">
<span>地址:</span>
<input :value="myStore.text" v-on:input="onInput" />
</div>
</template>
<script setup >
import { useMyStore } from '../store';
const myStore = useMyStore();
const onInput = (e) => {
myStore.updateText(e.target.value);
}
</script>
<style>
.v-text {
width: 400px;
margin: 20px auto;
padding: 10px;
box-shadow: 0px 0px 16px 0px #00000038;
border: 1px solid #d6d5d5;
font-size: 20px;
color: #222222;
background: #2196f34d;
font-size: 16px;
}
.v-text input {
width: 200px;
height: 32px;
line-height: 32px;
margin-right: 10px;
box-sizing: border-box;
font-size: 16px;
}
</style>
|
子组件(商品规格选择器):
1
2
3
4
5
6
7
8
9
10
11
12
13
14
15
16
17
18
19
20
21
22
23
24
25
26
27
28
29
30
31
32
33
34
35
36
37
38
39
40
41
42
43
44
45
46
47
48
49
50
51
52
53
54
55
56
57
58
59
60
61
62
63
| <template>
<div class="v-list">
<div class="v-list-item" v-for="(item, index) in myStore.list">
<span class="text">{{item.name}}</span>
<span class="text">单价: {{item.price}}</span>
<button class="btn" v-on:click="myStore.decrease(index)">-</button>
<span class="count"> {{item.count}}</span>
<button class="btn" v-on:click="myStore.increase(index)">+</button>
</div>
</div>
</template>
<script setup>
import { useMyStore } from '../store';
const myStore = useMyStore();
</script>
<style>
.v-list {
width: 400px;
margin: 20px auto;
padding: 10px;
box-shadow: 0px 0px 16px 0px #00000038;
border: 1px solid #d6d5d5;
font-size: 20px;
color: #222222;
background: #2196f34d;
font-size: 16px;
}
.v-list .v-list-item {
border-bottom: 1px solid #7aafe29c;
line-height: 32px;
padding: 4px 0;
text-align: left;
display: flex;
justify-content: center;
align-items: center;
}
.v-list .v-list-item .text {
width: 120px;
display: inline-block;
text-align: center;
}
.v-list .v-list-item .count {
min-width: 50px;
display: inline-block;
text-align: center;
font-size: 24px;
font-weight: 800;
color: #026181;
}
.v-list .v-list-item .btn {
display: inline-block;
width: 40px;
height: 40px;
font-size: 30px;
cursor: pointer;
box-sizing: border-box;
}
</style>
|
这里要特别注意,在使用Pinia时候,在Vue.js3应用挂载DOM节点前,要在Vue.js3应用里加上Pinia插件的使用,也就是注册Pinia插件到项目里:
1
2
3
4
5
6
7
8
9
| import { createApp } from 'vue';
import { createPinia } from 'pinia';
import App from './app.vue';
const app = createApp(App);
const pinia = createPinia();
app.use(pinia);
app.mount('#app');
|
更多Pinia的使用方式,你可以查看Pinia的官网。
总结
这节课到这里就结束了,这节课我们讲了多个案例,带你体验了Vue.js3的组件间数据通信的多个方式,主要有三种,也各有优缺点:
- 基于Props+Emits的组件数据通信,让数据流向更加清晰,但是需要写很多组件间事件回调的传递代码;
- 基于公共响应式数据文件进行通信,最简单,也是最能发挥响应式特性,但是代码管理不善容易带来数据通信混乱;
- 基于Pinia的公共数据状态管理,虽然增加了学习成本,但是能管理好项目数据流向,也充分利用响应式的特性,来实现复杂大型项目的组件间通信。
在实际项目开发过程中,我们可以根据不同方式的特点灵活选择:
- 如果开发一些Vue.js组件库,可以基于Props+Emits来做组件库内部数据通信,这样可以方便管理组件库里组件的数据状态变化,减少数据污染;
- 如果要快速开发一些小型Vue.js3应用,可以直接“基于公共的响应式数据文件进行通信”,因为这种方式比较自由方便,不用写太多的数据定义和自定义事件的代码;
- 如果要开发大型Vue.js3项目,例如一些管理后台等复杂应用,建议你用Pinia来进行组件间的数据通信,方便数据的灵活使用和状态数据的流向管理。
希望你在后续进行Vue.js3跨组件的数据通信开发过程中,能够灵活且优雅地运用上述的多种方式。
思考题
我们这节课主要讲解多种跨组件的数据通信方式,每种方式虽然有其适用的场景,但是若使用不规范,都会存在响应式数据被污染的隐患,那么如何更好地保护响应式数据,在跨组件通信过程中得到规范使用呢?
欢迎和我一起讨论,期待在留言区看到你的身影。